
Making a Dungeon Crawler in Unity Part 1: Tiled
In August,1 I made a dungeon crawler called Champions of Shond: Echoes of Faith. It’s the second dungeon crawler I made this year, after Sanctuary's Grasp. For the latter, I used in-scene editing tools, but for Champions of Shond (COS), I wanted to explore using some tools that would simplify the creation process and not require multiple Unity scenes.
To accomplish that, I used Tiled and ink, both of which I found more or less intuitive and very useful. This part will discuss Tiled, a 2D map editor.
I’d toyed with using Tiled for a while. With each earlier jam I’d enter where it could be relevant, I had thought about using it, but the initial setup of making a tileset and integrating it with Unity or Phaser scared me off. This time, I finally did it.
These posts are written with an assumption that you have a healthy knowledge of C#, as I won’t be explaining any language constructs. Believe me—you don’t want me to try.
Basic Tiled Setup
The biggest obstacle I’d had in using Tiled before was that creating the actual tileset felt like an ordeal in and of itself: that I’d need to plan out everything before I started. This time, I made everything representative. The color signified the “theme” that would be chosen when instantiating the prefabs, and the tile the way each generated object behaved.2
Tiled supports multiple different types of layers, but I ended up using two of them: tile layers, which allow you to place exactly one tile on a grid square, and object layers, which store objects of any sort of size and shape arbitrarily on the map.
My maps are made up of three different layers:
- BaseView, a tile layer
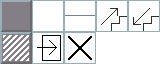
These determine the behavior of tiles and how they are rendered; tiles represent concepts like “wall”, “floor”, “illusionary wall”, and “invisible wall”. You can see the full tileset for this below.3
- ThemeView, a tile layer
This specifies how the tiles should be drawn. In COS, green represents the overworld theme, yellow the first theme, red the second, and blue the third. The associations of the wall/ground/etc. tiles to the theme is set up directly in Unity as part of the Tiled loading process.

- Interactables, an object layer
These specify all the interactables, entrances, exits, and anything that you can see4 that isn’t a wall or a floor. The different images in this tileset are just for ease of reading the map—they don’t actually affect how the objects load or behave.5

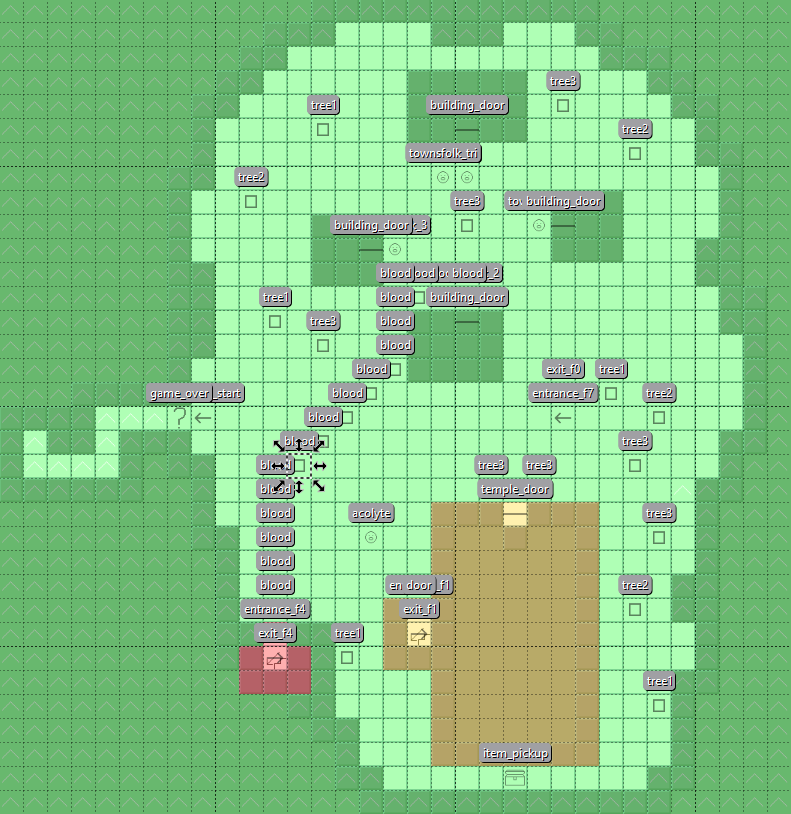
The main drawback with the “theme” approach is that it makes it cumbersome to add environmental variety. If I wanted to have have a dirt road going through the town,6 I’d need to specify a theme for each different tile. This adds up quick and makes it hard to follow visually.
Ideally, I’d replace the theme tileset with the actual images that I wanted to render, which would allow greater flexibility in drawing, while still keeping the “tiles” and “objects” tilesets the same. The downside of that approach is that it makes it easy to postpone working on the actual level, and potentially cumbersome to change the tiles drawn. For my next crawler, I might try starting with the theme approach and pivoting into the tileset approach once I have my general game direction down.
Rendering the World
To render the world, one must first load it. Tiled saves its maps in the .tmx format. There are a few ways to load these: if I put them into a StreamingAssets or Resources folder, I could have loaded them by iterating over the files. The former, since it actually dumps them into the file system, would have allowed for modding. The latter, since it puts them into an asset bundle, would make it harder.
The approach I took, which isn’t necessarily the better approach, was to create a ScriptableObject that just held a list of TextAssets. Unfortunately, Unity determines the type of a file by its extension, and .tmx is not a supported type for TextAssets. I could rename all my map files to .txt, but that would make iterating in Tiled more of a bother. Thankfully, it’s easy to fix that, as Unity allows you to specify custom importers.
Just add a file named TmxImporter.cs to an Editor directory, with the following contents:7
using UnityEngine;
using UnityEditor.AssetImporters;
using System.IO;

[ScriptedImporter(1, "tmx")]
public class TmxImporter : ScriptedImporter {
    public override void OnImportAsset(AssetImportContext ctx) {
        TextAsset subAsset = new TextAsset(File.ReadAllText(ctx.assetPath));
        ctx.AddObjectToAsset("text", subAsset);
        ctx.SetMainObject(subAsset);
    }
}
After that, you’ll be able to add .tmx files to scripts as if they were TextAsset files. Convenient! If I were to do it again, I’d probably just load them from the StreamingAssets folder,8 although that does require more error-handling.
Now that we have the TextAsset, we can load the map. Since Tiled doesn’t have any dedicated Unity tooling, I used TiledCS to import the data into Unity. While most people who use Tiled are using it in a 2D game and want the layer in Tiled to actually be rendered on the screen, that isn’t true for a dungeon crawler. At the very least, walls need to be drawn differently.9 TiledCS lets me access the data directly.
Once you’ve got the .tmx file into a TextAsset, creating a TiledMap from it is simple.
TextAsset map = Maps.GetOrWarn(key, "Map");
if (map == null) return;

_map = new TiledMap();
_map.ParseXml(map.text);
Getting access to the layers is similarly easy.10
TiledLayer layer = _map.Layers.Where(x => x.name == "BaseView").FirstOrDefault();Tile layers are made up of an array of integer ids. These identifiers map to the index of the tile in the tileset, going from left-to-right, top-to-bottom, starting at one. However, all the tilesets share the identifier space. To determine the offset for each tileset, you can look it up on the map:
TiledMapTileset tileset =
    _map.Tilesets.Where(x => x.source == "generic.tsx").FirstOrDefault();
int offset = tileset == null ? 0 : tileset.firstgid;
This offset is used to determine the true value of the tiles in the tileset. This approach does require that each layer exclusively have tiles from the expected tileset, but that’s sufficient for my purposes.
Now comes the actual construction:
Vector2Int pos = Vector2Int.zero;
for (var y = 0; y < _map.Height; y++) {
    pos.y = y;
    for (var x = 0; x < _map.Width; x++) {
        pos.x = x;

        var gid = LookupGID(_baseLayer, pos);

        var themeId = LookupThemeGID(_themeLayer, pos);
        DungeonTheme theme = LookupTheme(themeId);

        if (gid == TileTypeGIDs.None) {
            continue;
        }

        GameObject go = new GameObject();
        go.transform.position = WorldPosition(pos);
        go.name = $"Tile: {pos}";

        if (DrawsOnTile(gid)) {
            CreateObjectForGID(theme, gid, pos, WorldPosition(pos), go.transform);
        }

        if (TileDrawsAdjacentWalls(gid)) {
            DrawWalls(pos, envObject.transform);
        }
    }
}
The only oddity here is WorldPosition, which transforms Tiled’s “y decreases as you go up” coordinate system to Unity’s “y increases as you go up” one.
Attributes of the tile types are contained within switch statements, like so:
bool TileDrawsAdjacentWalls(TileTypeGIDs gid) {
    return gid switch {
        TileTypeGIDs.Floor or
        TileTypeGIDs.DoorNS or
        TileTypeGIDs.InvisibleWall or
        TileTypeGIDs.Exit or
        TileTypeGIDs.StairsUp or
        TileTypeGIDs.StairsDown or
        TileTypeGIDs.ImpassableFloor => true,
        _ => false,
    };
}
Some people dislike this approach, since it requires multiple switch statements to declare different properties. I think the opposition to it is a bit overstated, but if I make another crawler, I’ll probably use tile properties11 instead.
Regardless of how you read the attributes of the different tiles, there does need to be a mapping of theme + tile to a prefab to instantiate. I use a ScriptableObject that maps GIDs for a given theme to the tile.
[CreateAssetMenu(menuName = "Dungeon/Theme", fileName = "Theme")]
public class DungeonTheme : ScriptableObject {
    [System.Serializable]
    public struct Info {
        public MapLoader.TileTypeGIDs GID;
        public GameObject Item;

        public bool IsValid() {
            return Item != null;
        }
    }

    [SerializeField] int _themeId;
    [SerializeField] Info[] Items;

    public int ThemeID { get => _themeId; }

    public Info InfoForKey(MapLoader.TileTypeGIDs gid) {
        return Items.Where(x => x.GID == gid).FirstOrDefault();
    }

    public GameObject ObjectForKey(MapLoader.TileTypeGIDs gid) {
        Info info = InfoForKey(gid);
        if (info.IsValid()) return info.Item;
        else return default;
    }
}
There’s nothing particularly novel here. I do use a serializable struct to mimic a dictionary structure in the Unity inspector. This approach, however, does not prohibit duplicate keys. An OnValidate method could be used to have it yell at you if you have a duplicate.
Constructing floors and walls is simple as long as you don’t have any special corner behavior or tile theme transitions.12
GameObject CreateObjectForGID(DungeonTheme theme, TileTypeGIDs gid,
                              Vector2Int gridPos, Vector3 pos) {
    if (theme == null) {
        Debug.LogWarning($"Trying to draw {gid} with no theme at {gridPos}!");
        return null;
    }
    if (gid != TileTypeGIDs.Floor && TileDrawsDefaultFloor(gid)) {
        CreateObjectForGID(theme, TileTypeGIDs.Floor, gridPos, pos, parent);
    }

    GameObject obj = theme.ObjectForKey(gid);
    if (obj == null) {
        Debug.LogWarning($"Object not set for gid {gid} on theme {theme.ThemeID}");
        return null;
    }
    GameObject go = Instantiate(obj, parent);
    go.transform.position = pos;
    return go;
}
The TileDrawsDefaultFloor check is exclusively for invisible walls, which should both draw a floor as well as draw walls between the tiles. The approach I took results in some extra wall and floor objects for invisible walls, which was not a problem with how I was rendering everything. If I didn’t want to reuse the object drawing code for walls, the TileDrawsDefaultFloor if condition could return.
void DrawWalls(Vector2Int pos, Transform parent) {
    Vector3 spawnPos = WorldPosition(pos);
    MaybeDrawWall(spawnPos, pos, new Vector2Int(1, 0), parent);
    MaybeDrawWall(spawnPos, pos, new Vector2Int(-1, 0), parent);
    MaybeDrawWall(spawnPos, pos, new Vector2Int(0, 1), parent);
    MaybeDrawWall(spawnPos, pos, new Vector2Int(0, -1), parent);
}

void MaybeDrawWall(Vector3 spawnPos, Vector2Int source,
                   Vector2Int offset, Transform parent) {
    Vector2Int pos = source + offset;
    TileTypeGIDs baseGID = LookupGID(_baseLayer, pos);
    if (TileIsWall(baseGID)) {
        int rot = offset.x != 0 ? (offset.x > 0 ? 90 : -90) : (offset.y > 0 ? 180 : 0);

        int gid = LookupThemeGID(_themeLayer, pos);
        DungeonTheme theme = LookupTheme(gid);
        GameObject go = CreateObjectForGID(theme, baseGID, source, spawnPos, parent);
        if (go != null) {
            go.transform.localEulerAngles = new Vector3(0, rot, 0);
        }
    }
}
Walls are easy—just check if the tile should draw adjacent walls, and if it does, draw any tile marked as drawing walls. This is simpler if you don’t have illusory walls or impassable floors, but the logic isn’t very complex.
That’s it! A fully visualized dungeon that you can’t interact with at all.
Possible Improvement: Tile Properties
Tiled allows properties to be set on individual tiles in a tileset. To read these, you need to additionally load the .tsx file with TiledCS. This would allow the switch statements above to be replaced by parameters set on the individual tiles themselves, which consolidates the logic somewhat. The tile GIDs would still need to be read manually, as there still needs to be a mapping of a GID to the instantiated GameObject in code, which isn’t possible to link in Tiled.
Possible Improvement: Merging Tile Meshes
From what I’ve read, there is performance gain that can be gathered by merging meshes that share a common material. Mesh.CombineMeshes is the mechanism to use.
My MeshMerge script will glom together all of the meshes under one GameObject into a single mesh for you. It’s simple, not taking into account differences in render behaviors or non-static objects. Keep in mind that once you combine the meshes, you lose the ability to move them separately.
Understanding the World
The world exists, but our crawler has no idea of how to let the player navigate the world. A grid exists, but our game doesn’t know how it actually works. Some crawlers use raycasting to determine if a location can or cannot be navigated to, but that allows for grid misalignment to prevent movement and for the player to run wild if they escape the map.
Is there a simpler way? I think so.
My tile drawing code in the previous section had some extra parts that I cut out of it, and the following is one of them:
...

GameObject go = new GameObject();
go.transform.position = WorldPosition(pos);
go.name = $"Tile: {pos}";

if (TileIsWalkable(gid)) {
    go.AddComponent<DungeonFloor>();
}
...
Every tile that entities can walk on gets a DungeonFloor component. That component is quite simple:
[DefaultExecutionOrder(-99)]
public class DungeonFloor : MonoBehaviour, DungeonGrid.GridObject {

    void Awake() {
        DungeonGrid.INSTANCE.RegisterNode(this);
    }

    public DungeonGrid.GridItemInfo GridItemInfo() {
        return DungeonGrid.INSTANCE.InfoForLocation(transform.position);
    }

    private void OnDrawGizmos() {
        Gizmos.color = new Color(0,1,0, 0.2f);
        DungeonGrid instance = DungeonGrid.INSTANCE;
        Vector2 size = (instance != null ? instance.CellSize : Vector2.one) * 0.9f;
        Gizmos.DrawCube(transform.position, new Vector3(size.x, 0.1f, size.y));
    }
}
Other than drawing a gizmo to show that it’s walkable on the editor, all it does is implement the GridObject interface and register itself as walkable with the DungeonGrid instance set on the scene.13 Its default execution order is set to -99 in order to ensure that it’s after DungeonGrid, which is -100, but before anything that can be placed on the grid, which have the value zero.
GridObject consists solely of the one method, which returns a GridItemInfo, which provides access to the world position of the object, its position on the grid, and whether or not it’s on an edge. DungeonGrid generates this for the object given a position, in case the object wants to report a different transform than its own.
public struct GridItemInfo {
    public Vector2 GridPosition;
    public Vector3 WorldPosition;
    public bool OnEdge;

    public GridItemInfo(Vector2 gridPosition, Vector3 worldPosition, bool onEdge) {
        GridPosition = gridPosition;
        WorldPosition = worldPosition;
        OnEdge = onEdge;
    }
}
Possible Improvement: Non-Singleton Grids
The current approach I have uses a singleton to access a DungeonGrid instance. This approach simply will not work if you want to have multipled grids. This was inherited from Sanctuary’s Grasp, which used DungeonFloor objects baked into the scene. Since I’m directly adding the DungeonFloor value itself, it would be trivial to give it a reference to the DungeonGrid here.
I’ll likely make this change the next time I make a dungeon crawler.
Possible Improvement: Use Tiled Data
The Tiled map has all the information, so DungeonGrid could map the world coordinates back into tiled ones to match against the map. Determining if movement was possible would be a matter of checking the tile data here and the realtime position of objects.
Honestly, this approach feels bad to me, although I can’t quite put my finger on why. It does give some wins, like not depending on the tiles to determine their own coordinates. I think the biggest source of hesitancy for me is that DungeonGrid is a holdover from Sanctuary’s Grasp, and wouldn’t need to change if I decided to move to a different way of loading maps.14
Rendering Stuff in the World
Objects are represented in list format on object layers. All objects from object layers can be loaded using the following code. If you only want to load some object layers, you can search for that specific one, similar to how I’m looking for the “BaseView” layer above.
foreach (TiledLayer objects in _map.Layers.Where(
        x => x.type == TiledLayerType.ObjectLayer)) {
    foreach (TiledObject obj in objects.objects) {
        MakeObject(obj);
    }
}
Object behave a little bit strangely, as there are standard objects and tile-based objects. Standard objects have the y value for their top coordinate, whereas for tile-based ones, it uses the bottom. This can be corrected for as follows:15
Vector2 correctedPos = new Vector2(obj.x, obj.y);
if (obj.gid != 0) {
    correctedPos.y -= obj.height;
}
Objects can be drawn with similar logic to how tiles are drawn: just instantiate a GameObject on the tile. Analogous to DungeonFloor, I add a DungeonEntity component to objects. This script handles several things, most notably adding itself to the grid as an object and updating itself with the grid when its position changes.
Interacting with the World
All the interactions in COS happen through interacting with objects. Exits are objects. People are objects. Doors are objects. Keys are objects. They’re all objects!
Now that we have a mechanism for iterating through the objects and rendering them in the world, how do we interact with them?
The answer? DungeonGrid. We know where the floors are, since they registered themselves. We know where the objects are, since they registered themselves. We know where the player is, since they registered themself.16
When the player presses the interaction button, I look for an object on the square they’re facing. If there is one, and it’s interactable, I start the interaction and prohibit user action until that interaction has finished.
Here’s the entirety of my code to handle player interactions:
public IEnumerator HandleInteraction() {
    OnBeforeInteract?.Invoke();

    _awaitingAction = true;
    DoAction();

    while (_awaitingAction) yield return null;

    OnAfterInteract?.Invoke();
}
DoAction() is implemented by subclasses and they call the ActionFinished() method, which clears _awaitingAction. It’s simple!
How do objects know what interaction they should perform? Properties. They let you configure objects in Tiled to your heart’s content.
Properties
Properties are the meat and potatoes of how I hooked up the objects with their behavior. It’s a Tiled concept that allows you to specify key-value pairs to Tiled maps and objects. As far as I could tell, you can’t attach them to arbitrary tiles on the map.
Attaching metadata to maps is useful for a variety of things, like having a canonical map name in one place for display. Additionally, I use it to set the random encounter rate and variance for each map. Any per map metadata can be easily attached here. My map metadata tended to be light, comprising of only the keys I mentioned above.
Objects are a different story. Any object other than the player was specified almost entirely through object custom properties. In tiled, objects allow you to specify a custom shape, but that was overkill for my grid-aligned items. Thankfully, it also lets you place objects as if they were tiles.17
In the object configuration, the object’s name, class, and custom properties had meaning when loading the level.
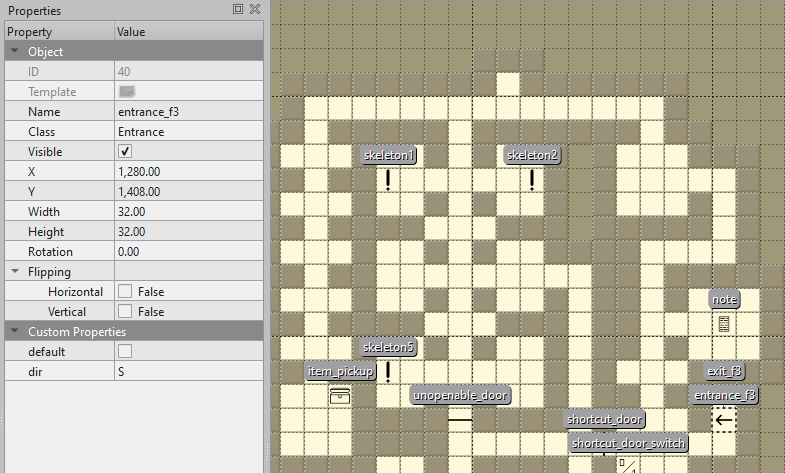
For instance, the above object properties are for an entrance into the third floor. The class, “Entrance”, serves as a shorthand for what scripts I attach to the instantiated object. For Entrance, I attach the DungeonEntrance class. This mapping is specified manually in my MapLoader code.
The Name property is used to populate the name of the DungeonEntrance and is used to determine which entrance to spawn at.
The two custom parameters are a boolean value for default, which specifies whether it’s the entrance to use if no entrance to use is specified,18 and dir, an enum that specifies which direction the player should face on entering the map.19
These parameters are powerful, and are what I use to determine the images to render, how to render them, and how the player interacts with the object on the square, if at all.
While I have special behavior for entrances and exits, most of my interactable objects are of the InkInteractable class, which specified an ink passage to be run on interactions. Once the ink script has finished running, it returns control back to the user. ink will be covered extensively in the next post.
As for Tiled, well, that’s pretty much it! I’m sure Tiled has a bunch more functionality useful for this use case that I have discovered yet, so read the documentation. Always look for a second opinion.
Downsides/Pitfalls
Runtime Generation
Setting up the levels in Tiled and loading them directly from there means that you’ll generate them at runtime. This doesn’t let you have static geometry or baked lighting, which gives you gains in performance, lighting, and a variety of other categories. Ostensibly you could generate the scenes statically from Tiled into Unity prior to shipping, but that isn’t something I cared to do.
Some of this can be reclaimed by doing a mesh merging step when loading the scene, but to my knowledge there’s no runtime equivalent to baking lighting available.
Loading Floats
If you’re loading floats from object properties, you need to be careful about how you parse them. Tiled spits out properties as strings, so you’ll need to cast them yourself. As you may or may not know, the decimal separator differs by country. Tiled, I believe, always exports the values using . as the separator, but C#’s float.Parse() uses the region’s parsing system by default. This means that if someone from say, France, tries to play your game, they will get an exception as the parsing code will expect to see a , to separate the integer component from the fractional one, but will actually see a ..
Thankfully, the fix is easy. If you use:
float.Parse(<number>, CultureInfo.InvariantCulture)It will always expect . to be the decimal separator. I suspect most programming languages will run into a similar issue.
Parameter Typos & Associations
While this wasn’t an issue I ran into when developing my game, I was always on the lookout for it happening. Since the custom properties are custom keys, eventually you will mistype one of them. I did not have any checks for unrecognized parameters or class names, so a typo would have caused issues down the line. Some sort of autocomplete in the editor for Tiled custom properties would be convenient.
Similarly, I had some properties that always appeared together, like sideSprite, which indicated that a sprite was intended to be drawn on one side of a tile, and sideSprite_dist, which indicated the distance from the center to draw it. I never wanted one without the other, and definitely wouldn’t have wanted sideSprite_dist without sideSprite.
This sort of loose association is always error-prone, and I would’ve liked the ability to have structs specified with a specific list of keys in Tiled.
Similarly, object references are permitted, but not cross-map ones. It would have been nice to be able to link map exits with their corresponding entrances, but this wasn’t possible.
However, as I said, this wasn’t a problem that actually bit me in the jam. If I were to use this mechanism for a larger project, I would have implemented some sort of validation, which would catch all of these issues easily.
It would be trivial to make a test that would pull in all your files and enforce a bunch of rules on them, like “this property must always come with that property” or “properties must be in this list”. As long as you remember to run them, it should be helpful in location issues.
Gluing it Together
Validation
You should validate the references. Validate your expected associations. Validate that exits go to a valid location. Validate that you don’t see any unexpected keys. Validate that you don’t see any unexpected values. Your future self will thank you. Errors will manifest in subtle ways, and just running the tests frequently might be enough to save you a few headaches down the line. I didn’t do it because I was under time constraints, but the tools are all there.20
If you are planning to follow a similar approach, I’d recommend trying to tie your object loading pipeline to your validation pipeline to catch any issues early.
-
Well, last August, now what I’ve come back to finish this article. I really let this one linger. ↩︎
-
Sometimes with some rendering metadata attached. ↩︎
-
Note that while a door is included with the tileset, I decided to represent them with an object instead. ↩︎
-
Or sometimes, can’t see. Spooky! ↩︎
-
Some people would argue that having different images with no rigid behavioral enforcement is a mistake, as it could cause the user to misunderstand what an entrance did if, say, it had the icon for an enemy. That’s true. For me, my error rate is low enough (0, so far) that the enhanced glanceability of the map is worth it. ↩︎
-
Which I did, but didn’t end up doing for this reason. ↩︎
-
The siren song of allowing mods calls to me, even though I doubt my games will ever be popular enough to get mods. The downside of this approach is that it’s easy for someone to open up the map, see all your secrets, and tweak things. Maybe a problem for you; generally not a problem for me. See the “not popular enough” comment above for why. ↩︎
-
Actually, they don’t. I wonder what a dungeon crawler that drew all of its walls on the ground, abandoning some of the artifice, would feel like. Probably pretty bad, since it would make room boundaries harder to read. On the other hand, you’d have made the Dogville of first person dungeon crawlers, so I guess that’s good? Maybe? ↩︎
-
Keep in mind that “BaseView” is a reference to the layer name I’ve set up. Constants might be better for this if you’re using these strings multiple places, but fundamentally you’ll need to have this string literal in both Tiled and Unity. ↩︎
-
See the Possible Improvement section below. ↩︎
-
Even then, it’s not too onerous, just a bit of extra computation and graphics. ↩︎
-
Yes, this is the much-maligned singleton pattern. This was more convenient in Sanctuary’s Grasp when I wasn’t adding this component in
MapLoader(which also holds theDungeonGridinstance). It could be changed over, and probably will be, but I struggle to think of a reason why having multipleDungeonGridinstances in a scene would be a good thing. Up to you. ↩︎ -
I’m sure advocates of the raycasting approach would say the same, though, so keep that in mind. ↩︎
-
Non-tile based objects will have a gid of zero, distinguishing them from tile objects. ↩︎
-
NB: Not shown, but a player is basically just an object that you choose where to place when loading a scene. ↩︎
-
If you wanted to establish different zones, with, say, a different name or random encounter rate, these custom shapes may be the way you want to go. You would, however, need to determine whether the player was in the square yourself. Since it’s just polygons, rectangles, and ellipses, it should be pretty straightforward with any number of algorithms online. ↩︎
-
It’s also useful when loading into the map directly to test. Without any default entrance, it just takes the first one that registers itself. ↩︎
-
The object’s rotation could have been used as well, but that feels more difficult to easily follow when editing the object, and, since it rotates around the bottom left of the tile and not the center, it causes it to change which tile it’s visually on. It would be nice to have the arrow pointing in the correct direction though. ↩︎
-
Ideally, you’d use some sort of git hooks to not let you commit if Unity tests are failing. I don’t know nearly as much about those as I should, so I don’t know how feasible it is, but I’m sure someone has done it, if you can. ↩︎