
Making a Very Bad Scripting Language Part 3: Building a VS Code Language Server
Once I finished the TextMate grammar to get syntax highlighting, I’d gotten a taste for adding little language tools. I really wanted autocomplete or type checking, but that’s a few steps down the line. First, I needed a language server.
Language servers are how VS Code (and a handful of other IDEs) provide more in-depth language features: hover tooltips, autocomplete suggestions, yellow and red squigglies for warnings and errors, definition click-through, and semantic highlighting. I’d wanted to play around in this space for a while, and this was a good excuse for a simple implementation.
As a refresher: KVBSL only has a couple of built-in concurrency modifiers, and everything else is implemented as externally registered commands. The implementations pass in their handlers and get a list of string tokens on invocation. Here’s an example of the language:
wait 5
and play_sound IntroSound
bg ramp_float_so FaderRef 1 0 1.0
As usual, our journey begins with the documentation.1 In this case, it recommended that I work off of a sample, so that’s what I did (this one). Like with the TextMate grammar, <project_root>/package.json had to be updated to say that it supported my language. However, unlike the TextMate grammar, I had to add an activation event to it.
"activationEvents": [
    "onLanguage:kvbsl"
],
This tells VS Code to start the client part of the extension when a .kvbsl file is opened. The client/src/extension.ts that is started by the activation events tells the server code to run and registers which files to register for (.kvbsl files). The server then sends back its capabilities in connection.onInitialize.2
connection.onInitialize((_: InitializeParams) => {
	const result: InitializeResult = {
		capabilities: {
			textDocumentSync: TextDocumentSyncKind.Incremental,
			diagnosticProvider: {
				interFileDependencies: false,
				workspaceDiagnostics: false
			},
			hoverProvider: true,
			semanticTokensProvider: {
				legend: semanticTokenLegend,
				full: true
			}
		}
	};
	return result;
});
Lots of communication back and forth, but the sample project handles most of the setup for us. Now let’s go to the capabilities.
Hover Tooltips
Since command arguments are all strings, it’s helpful to know if a given string can be coerced to other types. To do that, I decided to add hover support, so you could hover over a symbol and get a list of all the different ways it could be interpreted. First, we need to add the capability hoverProvider: true to the InitializeResult (see above).
Then, of course, we need to actually provide the support. We do that with:
connection.onHover((params: HoverParams) => {
	const document = documents.get(params.textDocument.uri);
	if (!document) {
		return undefined;
	}

	const position = params.position;
	const lineNumber = position.line;
	const lineText = document.getText({
		start: { line: lineNumber, character: 0 },
		end: { line: lineNumber + 1, character: 0 }
	});

	return {
		contents: {
			kind: MarkupKind.Markdown,
			value: "This is a line!"
		}
	};
});
This gets the full line (which we don’t actually use) and returns a static markdown response saying “This is a line!”. This, of course, is not what I want to return, but it’s a good starting point for our changes.
Now, you might have noticed that I haven’t actually covered the parsing and tokenization. It began as a 1:1 port of my CommandParser.cs code here, but it evolved with each new capability (which I added in the order in which these sections are added here). To try to avoid reproducing my logic in whole here (it’s 150 lines and I’m going to be putting a lot of code in here), I’ll highlight key sections.
CommandParser’s tokenization returns a series of strings. For onHover, that’s pretty close to giving me everything that I want. The most obvious gap here is lacking a position: if I’m parsing the whole line, how do I know which token they’re hovering over? So let’s add a start and end point to our Token object.
export interface Token {
    value: string;
    location: { start: number; end: number };
}
This gives us basic tokens that we can use to send back information. Instead of sending back a constant value, we can send back the parsed value.
// Find which token we're hovering over.
const token = tokens.find(arg =>
position.character >= arg.location.start
&& position.character < arg.location.end);
if (!token) return undefined;
return {
contents: {
kind: MarkupKind.Markdown,
value: stringifyToken(token)
}
};
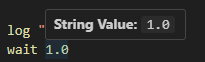
function stringifyToken(token: Token): string {
return `**String Value:** \`${token.value}\``;
}
If we run it, we see that things are working as expected.
Of course, this is only the string value of an argument, and I want to be able to tell what values will be able to successfully be parsed for all my values. Let’s just add these to the token class too!3
export interface Token {
    ...
    intValue?: number;
    floatValue?: number;
    boolValue?: boolean;
}
After parsing a token, I can augment it to see what values it matches.
function augmentToken(token: Token): Token {
	const lowerCaseValue = token.value!.toLowerCase();

    if (['true', 'on', 'yes', '1'].includes(lowerCaseValue)) {
        token.boolValue = true;
    } else if (['false', 'off', 'no', '0'].includes(lowerCaseValue)) {
        token.boolValue = false;
    }

	// Can't do parseFloat because that will match against something like "2foo".
	const numValue = Number(token.value!);
    if (!isNaN(numValue)) {
        token.floatValue = numValue;
    }

	// Similarly, we also check against numValue here to prevent the "2foo" case.
	// Then we also check the regex to prevent 2.2 from slipping in... what a pain.
	const intValue = parseInt(token.value!, 10);
    if (!isNaN(numValue) && !isNaN(intValue) && /^[+-]?\d+$/.test(token.value!)) {
        token.intValue = intValue;
    }

	return token;
}
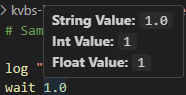
I have to do a couple of extra checks to more closely match how C# parses numbers under InvariantCulture, but I think this is pretty close.4 Now that we have the extra information, we can print it out.
export function stringifyToken(token: Token): string {
    const strs = [`**String Value:** \`${token.value}\``];
    if (token.intValue !== undefined) {
        strs.push(`**Int Value:** \`${token.intValue}\``);
    }
    if (token.floatValue !== undefined) {
        strs.push(`**Float Value:** \`${token.floatValue}\``);
    }
    if (token.boolValue !== undefined) {
        strs.push(`**Bool Value:** \`${token.boolValue}\``);
    }
    return strs.join('  \n');
}
This should be easy to follow. The weirdest part is the join on the newline with two spaces before it, which had to happen because otherwise the newline would be ignored.5
Now, my the actual token class my parser spits out is a little bit more complicated. I also have a TokenType set on tokens that can be one of concurrency, command, or argument. That’s populated in the tokenization method as well, but adding it seems like overkill; if the token is first and is bg or and, it’s a concurrency token. The next token (or first if there is no concurrency token) is the command token, and all the rest are argument tokens. After all, there’s no reason to show the coercions for concurrency or command tokens. Concurrency tokens give a short description of what it means, and command just (for now) lists its value.
But, after all that, we have nice hover capability! Pretty easy, all things considered.6
Diagnostics
If you remember from this last post, there are a few undesirable—but acceptable—corner cases in the TextMate grammar that I handled in a sub-optimal way to discourage their use. This is a perfect case for a diagnostic, which drives the yellow and red squiggly lines that can appear.
As with all capabilities, the first step is adding the diagnostic provider to the capabilities object:
diagnosticProvider: {
    interFileDependencies: false,
    workspaceDiagnostics: false
},
interFileDependencies being off tells that the diagnostics I’m going to be generating do not depend on other files,7 and workspaceDiagnostics being off tells that I will only be giving diagnostics for open files.
Now we need two pieces of glue to surface diagnostics to the client:8
connection.languages.diagnostics.on(async (params) => {
	const document = documents.get(params.textDocument.uri);
	if (document !== undefined) {
		return {
			kind: DocumentDiagnosticReportKind.Full,
			items: await computeDiagnostics(document)
		} satisfies DocumentDiagnosticReport;
	} else {
		// We don't know the document. We can either try to read it from disk
		// or we don't report problems for it.
		return {
			kind: DocumentDiagnosticReportKind.Full,
			items: []
		} satisfies DocumentDiagnosticReport;
	}
});
This method is how the diagnostics make their way back to the client. There are three diagnostics I thought of to support: unexpected escape character, unterminated quote, and concurrency keyword without a command.
The first two are naturally aligned to a single token, but the third makes more sense as an error on the command (even if that command is a single token), so I decided to add a diagnostic array to both Token and a newly created Command.
export interface Token {
    ...
    // Diagnostic is not my own class, but the type used by the LSP server itself.
    diagnostics: Diagnostic[];
}

export class Command {
    isComment: boolean;
    concurrency?: Token;
    command?: Token;
    arguments: Token[];
    location: { start: number; end: number };
    diagnostics: Diagnostic[];

    static fromLine(line: string, lineNumber: number): Command {
        return tokenizeLine(line, lineNumber);
    }
}
This gives me two places to attach diagnostics: the token level and the command level. My diagnostics are constructed as part of the parsing, so I’ll just be excerpting the relevant sections:
// When in the context of an escape and it's not the
// relevant quote character (the only supported escape).
currentTokenDiagnostics.push({
    severity: DiagnosticSeverity.Warning,
    message: `Unexpectedly escaped character: '${curr}'.`,
    range: {
        start: {line: lineNumber, character: i - 1},
        end: {line: lineNumber, character: i + 1}
    }
});

// When I've reached the end of a string and I'm still in the quote context.
currentTokenDiagnostics.push({
    severity: DiagnosticSeverity.Warning,
    message: 'Unclosed quote',
    range: {
        start: { line: lineNumber, character: tokenStart },
        end: { line: lineNumber, character: text.length }
    }
});

// After the string has been parsed.
if (concurrencyToken && !commandToken) {
    commandDiagnostics.push({
        severity: DiagnosticSeverity.Error,
        message: `Concurrency keyword must be followed by a command.`,
            range: {
            start: { line: lineNumber, character: concurrencyToken.location.start },
            end: { line: lineNumber, character: concurrencyToken.location.end }
        }
    });
}
Building these diagnostics during parsing avoids multiple passes, but it also means that I use more memory for the steps that don’t use it (like the hover tooltips). It’d be trivial to condition their generation, but, like I said, I don’t think the performance will be critical for my use case.
Now that we’ve got the diagnostics populated, we can actually return them by implementing computeDiagnostics().
async function computeDiagnostics(textDocument: TextDocument): Promise<Diagnostic[]> {
	const diagnostics: Diagnostic[] = [];
	const text = textDocument.getText();
	const lines = text.split('\n');

	for (let i = 0; i < lines.length; i++) {
		const line = lines[i];
		const command = Command.fromLine(line, i);
		if (!command) continue;
        // allDiagnostics combines the command diagnostics and token diagnostics.
		diagnostics.push(...command.allDiagnostics());
	}
	return diagnostics;
}
Now, assuming we didn’t make any mistakes, the diagnostics will work!9

Semantic Highlighting
With diagnostics well in hand, it’s time for the bit that provides the least utility for me (given that I have syntactic highlighting already): semantic highlighting. Semantic highlighting analysis the context of identifiers rather than just the syntax. Coincidentally, for my language as it is now, semantic highlighting provides no additional utility over syntactic highlighting.
However, as the TextMate grammar from the last post has a few edge cases I chose not to handle, using parsed tokens will provide extra value. First, we add the capability (with the legend provided by a variable, for reasons that will become obvious.).
const semanticTokenLegend = {
	tokenTypes: [
		SemanticTokenTypes.comment,
        SemanticTokenTypes.function,
        SemanticTokenTypes.keyword,
        SemanticTokenTypes.string,
        SemanticTokenTypes.number,
        'booleanLiteral'
	],
	tokenModifiers: []
};

...

// in capabilities
semanticTokensProvider: {
    legend: semanticTokenLegend,
    full: true
}
tokenTypes in the legend constrain what token types we can return. The hanging booleanLiteral will be explained later. We can provide the semantic tokens by implementing connection.languages.semanticTokens.on(), like so:
connection.languages.semanticTokens.on((params: SemanticTokensParams) => {
  const doc = documents.get(params.textDocument.uri);
  if (!doc) return { data: [] };

  const builder = new SemanticTokensBuilder();
  const lines = doc.getText().split('\n');

  function push(line: number, loc: { start: number; end: number }, tokenType: string) {
    const idx = semanticTokenLegend.tokenTypes.indexOf(tokenType);
    if (idx < 0) return;
	builder.push(line, loc.start, loc.end - loc.start,
        semanticTokenLegend.tokenTypes.indexOf(tokenType), 0);
  }

  for (let i = 0; i < lines.length; i++) {
    const cmd = Command.fromLine(lines[i], i);
    if (!cmd) continue;
	if (cmd.isComment) {
		push(i, cmd.location, SemanticTokenTypes.comment);
	}

    for (const tok of cmd.allTokens()) {
	  let type : SemanticTokenTypes | 'booleanLiteral' = SemanticTokenTypes.string;
	  if (tok.tokenType === TokenType.Concurrency) {
		type = SemanticTokenTypes.keyword;
	  } else if (tok.tokenType === TokenType.Command) {
		type = SemanticTokenTypes.function;
	  } else {
		if (tok.intValue !== undefined || tok.floatValue !== undefined) {
			type = SemanticTokenTypes.number;
		} else if (tok.boolValue !== undefined) {
			type = 'booleanLiteral';
		}
	  }
	  push(i, tok.location, type);
    }
  }

  return builder.build();
});
This should feel fairly similar to the other language features I implemented, as my command line parsing logic is doing most of the work. I provide a relevant semantic token for each of my own different tokens. Instead of actually passing the SemanticTokenType (or string that it represents) back to the client, it passes back the index of the element in the array I created in the legend. I don’t specify any tokenModifiers, so that is just set to 0.10
Interestingly, all the documentation I saw about semantic highlighting used an API that wasn’t available to me (passing the legend into the SemanticTokensBuilder). Not sure why, but the documentation is very lacking in this regard.
Now, booleanLiteral should stick out here like a sore thumb—there aren’t all that many options for the built-in semantic token types, but you can specify new ones (they’re all strings anyway). Critically, in addition to setting them in the legend, you also need to specify them in <project_root>/package.json under the "contributes" key.
"contributes": {
		...
		"semanticTokenTypes": [
			{
				"id": "booleanLiteral",
				"superType": "keyword",
				"description": "Boolean literals (true/false)"
			}
		],
		"semanticTokenScopes": [
			{
				"language": "kvbsl",
				"scopes": {
					"booleanLiteral": [
						"constant.language.boolean"
					]
				}
			}
		]
	},
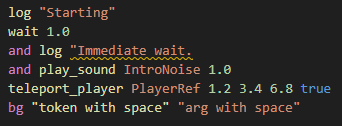
This specifies the additional semantic token type as well as the scope that it will be set to by the client. With that, we have working semantic highlighting!11
Conclusion
Despite seeming intimidating out of the gate, making a language server was surprisingly straightforward.12 It was a fun learning experience, and I’m looking forward to making another game where I use these scripts again.
My hope for the future is that I can add support for supported command definition files so that I can verify that there aren’t any typos in the command names or incorrect types being passed in, but that’s not going to be part of this. Partially because this post has gotten fairly long already, but also because I haven’t done it yet and I can feel an illness coming along.
I recommend trying to do this for yourself sometime. Making small languages is fun!
-
Unfortunately, this documentation isn’t great. ↩︎
-
This code block is a bit of a taste as to what capabilities are to come, so enjoy. ↩︎
-
This will use more memory, but since these scripts are not long, I’m not concerned. I’m not actually convinced it would use a meaningful amount of memory even if the script was long. ↩︎
-
I wouldn’t be surprised if there were some edge cases, but I’ll only tackle those once if they surface in a way that could be misleading. ↩︎
-
Single newlines don’t count as real in Markdown unless the preceding line ends with at least two spaces, which this is simulating. ↩︎
-
The main difficulty lies in the parser, and, in this case, the parser is simple. ↩︎
-
This will change if I add type checking. ↩︎
-
I’m not actually sure if both of these are required, or if they’re supporting different use cases and I only need one. Because the effort to support both in code is minimal, I have both. It may be that this is doing unnecessary work. ↩︎
-
Well, I’m writing this after, so I know it works. The actual process that I went through was iterative, first make sure that I could pipe data back through a diagnostic before actually trying to populate them. ↩︎
-
This doesn’t have any documentation that I could find, so I don’t know if that’s strictly right, but it didn’t mess anything up, so I guess it’s okay. ↩︎
-
Which probably isn’t all that exciting because the previous post had it too. ↩︎
-
Well, as long as the toy language you’re working with is incredibly simple. ↩︎